Herringbone Tile Inside Corner

Image Result For Herringbone Tile Inside Corner White Subway Tile Shower Bathroom Tile Designs White Subway Tile Bathroom

Herringbone Subway Tile Herringbone Tile Herringbone Tile Bathroom Tile Bathroom

Corner Of Herringbone Subway Tile Backsplash Remodelinspiration Herringbone Subway Tile Glass Backsplash Kitchen Subway Tile Backsplash Kitchen

Beveled Subway Tiles Corner Google Search Beveled Subway Tile White Subway Tile Backsplash White Beveled Subway Tile

Bathroom Incredible Bathroom With Gray Herringbone Tiled Bathroom Herringbone Interior Bathroom Trends Home Decor

Gorgeous Master Bathroom Boasts A Corner Walk In Shower Clad In White Subway Tiles Accented With Dark Wood Tile Shower Shower Floor Marble Tile Bathroom Floor

To start place a full tile a tilted at 45 degrees against the edge or corner of the work area in our example the right bottom side.
Herringbone tile inside corner.

Cream Herringbone Stone Mosaic Tile In Shower Https Www Pebbletileshop Com Products Cream Herringb Hampton Style Bathrooms Bathrooms Remodel Bathroom Design

Coastal Bathroom At The Walk In Shower And Herringbone Tile White Bathroom Tiles Bathroom Interior Bathroom Tile Designs

Marble Herringbone Fireplace Tiles Fireplace Tile Surround Herringbone Fireplace Fireplace Mantel Designs

10 Herringbone Tile Ideas Kitchen Tile Inspiration Trendy Kitchen Tile Tile Countertops Kitchen

Master Bathroom Shower With White Herringbone Tiles And Gray Grout Features Perfect Dimensional Patterns Goruntuler Ile Banyo Yeniden Modelleme Kucuk Banyo Modern Banyo

N Stair Nosing On Slip Stairtec Fo Profilitec Stena Plitka Sovremennyj Tualet Vnutrennyaya Otdelka

Authentic Subway Tile Subway Tile Clean Tile Tile Bathroom

Exactly The Look I M Going For Carrara Herringbone Tile Down The Center Surrounding The Fixtu Small Bathroom Remodel Bathrooms Remodel Master Bathroom Shower

Pin On New House

Archery White Oak Herringbone Mosaic Glass Tile In 2020 Shower Tile Bathroom Shower Walls Mosaic Shower Tile

How To Revamp The Kitchen Table In 2020 With Images Black Tile Bathrooms Herringbone Tile Bathroom Black Bathroom

32 Contemporary Tiled Bathroom Walls Decortez Master Bathroom Shower Bathrooms Remodel Bathroom Design

Hampton S Bathroom White Tile Herringbone Subway Tile Freestanding Bath Feature Bathroom Feature Wall Trendy Bathroom Tiles Herringbone Tile Bathroom
Herringbone Subway Tile Backsplash Creative Kitchen Backsplash Kitchen Tiles Backsplash Kitchen Inspirations

Hartwood Roses Workday Weekend Tutorial Tiling The Backsplash Bullnose Tile Guest Bathrooms White Tile Backsplash
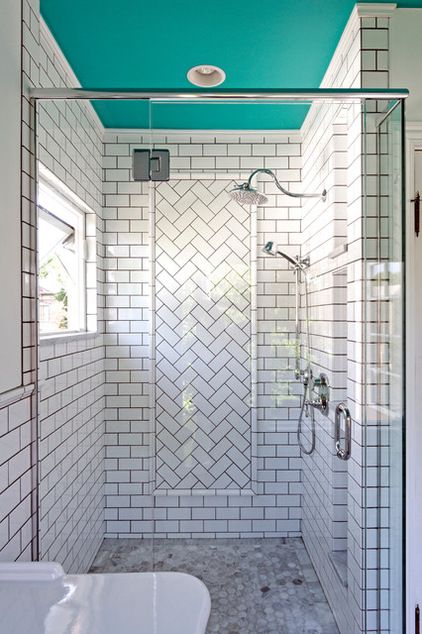
Room Of The Day A Splash Of Turquoise In A Vintage Inspired Bath Bathrooms Remodel Bathroom Design Painted Ceiling

6 Fabulous Ideas Shiplap Wainscoting Benjamin Moore Wainscoting Corners Subway Tiles Traditiona Herringbone Tile Floors Classic Bathroom Hexagon Tile Bathroom

Try This Herringbone Marble Tile A Beautiful Mess Herringbone Tile Flooring Marble Tile
Https Encrypted Tbn0 Gstatic Com Images Q Tbn 3aand9gcr1bmqrscilzvkfxxcwdlnkrw Nshx W226ltuhx2vhop6 Mh52 Usqp Cau

Where To End Kitchen Backsplash On A Corner Google Search Beveled Subway Tile Backsplash White Beveled Subway Tile Beveled Subway Tile

The Builder Depot Blog Tile Bathroom Master Bathroom Bathrooms Remodel

Toilet Ensuite White Herringbone Tile Bathroom Bathroom Feature Wall Grey Flooring

Pin By Fourteen Creative Co Brandi On Bathroom Bathroom Interior Design Tile Bathroom Bathroom Makeover

Interior Design Ideas Home Bunch An Interior Design Luxury Homes Blog Ship Lap Walls Installing Shiplap Shiplap Wall Diy
Source : pinterest.com
